
Repo updated on 2017-03-13: added additional debug configurations to check different options to enable/disable minification, optimization and obfuscation. See the discussion in Optimize without obfuscate your debug build, including this comment.
Sometimes you have to add code to your applications that is used for debugging purposes. This can be very useful, and sometimes is keep there as it helps in the development and debugging of different parts of the application. But, some of this code can have unintended consequences:
- it can reveal sensitive data to a potential attacker (internal URLs, session cookies, etc.)
- it can have a performance impact in your application (excessive logging, performing operations not needed for release builds, etc.)
- it can lower the security of your application (backdoor-like features to help while debugging, that can disable certain security features, or completely bypass them, etc.)
In Android development, there are a few techniques to disable those features in your code:
- using the debug flag with a simple
ifstatement -
debugCompilewith alternate library versions on Gradle scripts - alternate classes in your code depending on
buildTypeorflavor(source sets), also on Gradle scripts - Proguard code optimizations
Let’s explore the different options.
Notice that all this techniques can be applied to other JVM-based environments (desktop, server, or even other languages), given you’re using the same tools or an equivalent.
In my examples I’m assuming common Android development setup: Android Studio (currently 2.2.1), Gradle and Proguard.
The following examples are available in an simple application that I’ve uploaded to the following GitHub repo. All the examples except the one for the section “debugCompile with alternate library versions on Gradle scripts” can be found invoked from MainActivity.java in the example.
Using the debug flag with a simple if statement
The simplest way of disabling a piece of code is to wrap inside an if statement, like this:
ApplicationInfo appInfo = getApplicationContext().getApplicationInfo();
boolean isDebuggable = (appInfo.flags & ApplicationInfo.FLAG_DEBUGGABLE) != 0;
if (isDebuggable) {
    TextView buildTypeTextView = (TextView) findViewById(R.id.build_type);
    buildTypeTextView.setText("Debug build");
}
Pros:
- It’s simple and straightforward
- It’s flexible: you can add additional conditions
Cons:
- Code is still there, so it’s taking space. This increases download time and application startup time (load time).
- Code is still there, so it can reveal internal details that could help a potential attacker.
debugCompile with alternate library versions
An example of this can be seen in LeakCanary library by Square.
There, you can see that the following configuration needs to be added to build.gradle:
dependencies {
  debugCompile 'com.squareup.leakcanary:leakcanary-android:1.5'
  releaseCompile 'com.squareup.leakcanary:leakcanary-android-no-op:1.5'
  testCompile 'com.squareup.leakcanary:leakcanary-android-no-op:1.5'
}
You can see that instead of using a common compile statement, we’re using a different statement for each of the build configurations. Previous example is showing the common case, where you have two configurations, debug and release (hence compile becomes debugCompile and releaseCompile).
In that case, we use two libraries, consisting of the same interface (i.e. classes are the same in both libraries, but in the -no-op version all the classes are basically empty, and hence no-op). This means that calls to the library will not change independently of which version of the library we’re using.
Pros:
- Well-known technique. Already in use in some libraries.
- Code is not there. so it’s not taking space. This decreases download time and application startup time (i.e. load time).
- Code is not there, so it cannot reveal internal details that could help a potential attacker.
Cons:
- Methods are there (even if they are empty), counting against Android 65k method limit.
- You have to build and maintain two or more libraries.
Alternate classes in your code depending on buildType or flavor (source sets)
This method is similar to the previous one, but it is applied locally: any given build has different source sets, a set of folders that will be searched for source code to be compiled (resources follow slightly different rules) and the resulting classes merged together into a single DEX file, and finally used to build the final APK.
As it can be seen in the previous link about source sets, by default a number of folders are included in a given source set. If any of these folders doesn’t exist, it doesn’t cause any error, it’s simply ignored.
The common source sets use src/, then src/, then src/, and finally src/ (this can be changed in Gradle script, but this would provide enough material for another post).
For example, if we’re in a release build type, without any flavor, the following directories will be checked: src/main/java and src/release/java. If we were in a debug build type with a flavor called production, the following directories will be checked: src/main/java, src/debug/java, src/production/java and src/productionDebug/java.
It is important to take into account that the combination of the included source sets must not repeat classes. So, this means that we will usually have our classes in the main source set in src/main/java, that is the default folder used by Android Studio to add new code. But if we want to have a given set of functionality on different builds, we will have to repeat the source file across the folders of equivalent source sets.
For example, to have a functionality for debug and for release builds, we will create the same class in src/debug/java and in src/release/java. It is important that we do not create it, for example, in src/main/java and in src/release/java, as if we follow previous rules for searching the different source sets:
- it will work fine for debug builds, as it will check
src/main/javaandsrc/debug/javaand will find the class once but, - it will fail for release builds, as it will check
src/main/javaandsrc/release/javaand will find the class two times, thus conflicting.
In the example in GitHub we have the following classes:
In src/
public class Logger {

    private static final String TAG = Logger.class.getSimpleName();

    public static void log(String message) {
        Log.d(TAG, message);
    }
}
In src/
public class Logger {

    public static void log(String message) {
        // Empty method that does nothing for release builds
    }
}
Notice that they share the same public interface (an improvement will be that both really implement a common interface, to make it more maintainable), but the second one is basically and empty shell.
Also, in the following figure you will notice another important thing to take into account:

Notice that only the selected Build Variant (combination of Build type and Flavor) is visible in the project tree. This means that to edit the other build variant (in our case release) we will have to switch to it and edit. A solution I sometimes use is navigate to the directory (using Finder, Explorer, command line…) and duplicate the file first.
Also, in the following figure you will notice that current unselected variant shows the file with a red cross when open in the editor:

This file will be treated almost as a plain text file, as autocompletion will not work with it. Finally, the file of the unselected build variants will not be taken into account when doing automated refactor operations. This means that if for example we do a class rename, the class for the current Build Variants and all the calls to it will be changed, but not the alternate class for the other Build Variants.
As a mitigating factor, Find in Files is able to search in all the files, including the ones in currently disabled Build Variants. This can be useful to replace a method name or to find all the definitions and invocations (it’s easier if the method is properly named).
Pros:
- Standard Gradle technique. Quite well-known.
- Code is not there. so it’s not taking space. This decreases download time and application startup time (i.e. load time).
- Code is not there, so it cannot reveal internal details that could help a potential attacker.
Cons:
- Methods are there (even if they are empty), counting against Android 65k method limit.
- You have to build and maintain two or more class implementations.
- Most IDE tools do not take into consideration all the Build Variants when doing certain operations, like refactor operations (e.g. renaming a method). This means that code between different variants can get out of sync and will need to be manually adjusted.
Proguard code optimizations
Proguard is a well-known tool that allows to do lots of operations to shrink, optimize and obfuscate your code. One of the common uses is to reduce the number of methods in the final APK, to avoid running into the 65k method limit and having to create a MultiDex APK.
Proguard has a number of strategies here:
- inlining short methods (method/inlining/short), methods that are called once (method/inlining/unique) or tail recursion calls (method/inlining/tailrecursion),
- removing unused methods (not referenced by any method that should be kept; this is the common case that needs
-keep*when those are not identified by Proguard because they are invoked using reflection), - removing empty methods,
- removing methods that are explicitly marked as having no side effects
In the example code, when building in release mode, we can see the last two cases. Inlining would also kick in, as the methods are called just once from onCreate(), but has been disabled to make showing the other two cases more easy.
The example of removing empty methods can be seen in the same example as different Build Variants. If we open the release APK using the tool ApkAnalyser, we can see the following classes in the package com.xrubio.coderemove:

As you can see, only the class MainActivity is present, but not the class Logger. The reason is because in release, the log() method is empty, and because of that is removed during the shrinking. Given that it’s the only method in the class, the whole class is removed.
Then, if we dig a little more, we can see the following methods in the MainActivity class:
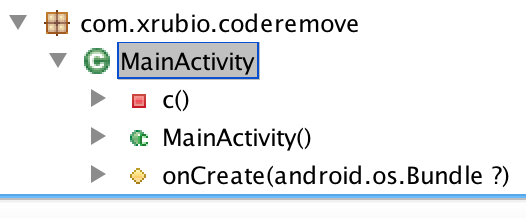
Here we can see the constructor, the onCreate() method and c() (that is debugFlagExample() method with its name obfuscated). The c() method is basically the same, but here we can see that:
- continuing with the previous optimization in where
Logger#log()has been removed,alternateSourceSetsExample()method is now also empty, and because of that is also removed (more about this later), -
outputDebugLogMessage()andproguardRemoveFunction()are also not present. The reason is that we’ve explicitly marked the methodoutputDebugLogMessage()as having no side effects.
So, to accomplish all this, first of all we have to enable Proguard with the following rules in build.gradle:
android {
    //...
    buildTypes {
        release {
            //...
            // Enable minification (using Proguard). Also notice that the default file used is the "-optimize" one.
            minifyEnabled true
            proguardFiles getDefaultProguardFile('proguard-android-optimize.txt'), 'proguard-rules.pro'
            //...
        }
        //...
    }
}
We’re enabling Proguard by using minifyEnabled true, plus loading standard Android rules with optimization enabled (proguard-android-optimize.txt) and our rules.
In our proguard-rules.pro file we add the following rule to mark the method outputDebugLogMessage() as having no side effects. This is the same technique showcased in Proguard Examples to disable logging.
-assumenosideeffects class com.xrubio.coderemove.MainActivity {
    private void outputDebugLogMessage();
}
As the method has no side effects, it can be removed by Proguard (both method body and the call in all the callee methods).
A similar thing happens with alternateSourceSetsExample() method. As it is empty, it is removed and the call in the callee method is also removed. This can be seen in the decompiled onCreate() method:
package com.xrubio.coderemove;

class MainActivity extends android.support.v7.a.d
{
    public MainActivity();
    private void c();
    protected void onCreate(android.os.Bundle ?);
    .registers 3

    0         invoke-super {p0, p1}, android.support.v7.a.d.onCreate(android.os.Bundle)void
    3         const v0, 0x7f04001a
    6         invoke-virtual {p0, v0}, com.xrubio.coderemove.MainActivity.setContentView(int)void
    9         invoke-direct {p0}, com.xrubio.coderemove.MainActivity.c()void
    C         return-void


}
Notice that there’s an invoke-virtual calling setContentView() and an invoke-direct calling c() (debugFlagExample()), but notice that there’s no trace of alternateSourceSetsExample() nor proguardRemoveFunction().
    @Override
    protected void onCreate(Bundle savedInstanceState) {
        super.onCreate(savedInstanceState);
        setContentView(R.layout.activity_main);

        debugFlagExample();

        alternateSourceSetsExample();

        proguardRemoveFunction();
    }
In conclusion, the code has been completely removed, making the APK smaller and leaving no trace of the original code.
Pros:
- Code is not there. so it’s not taking space. This decreases download time and application startup time (i.e. load time).
- Code is not there, so it cannot reveal internal details that could help a potential attacker.
- Proguard can also enhance the previous technique, by completely removing the empty methods and the call to it.
Cons:
- Proguard is much more complex to maintain (this is mitigated by the fact that many apps already make use of it).
- You have to maintain the rules targeting to the methods that you want to remove.
Conclusions
We’ve seen four techniques to disable and remove code, that are useful to disable or remove code that should not be present in release builds.
First technique, using the debug flag with a simple if statement, is very straightforward to implement, but leaves the code, making the APK bigger and giving clues to a potential attacker.
The second technique, debugCompile with alternate library versions on Gradle scripts, is useful for libraries, but has the downside that needs more maintenance, but makes the APK lighter.
Similar to the previous technique, the third one, alternate classes in your code depending on buildType or flavor (source sets), provides the same benefits and downsides as debugCompile but applicable for specific classes inside the same module.
Finally, Proguard code optimizations provide the most benefits, as it can inline, shrink, optimize, etc. but the cost of maintenance is much higher than previous techniques.